
Finding the track lanes, Part II

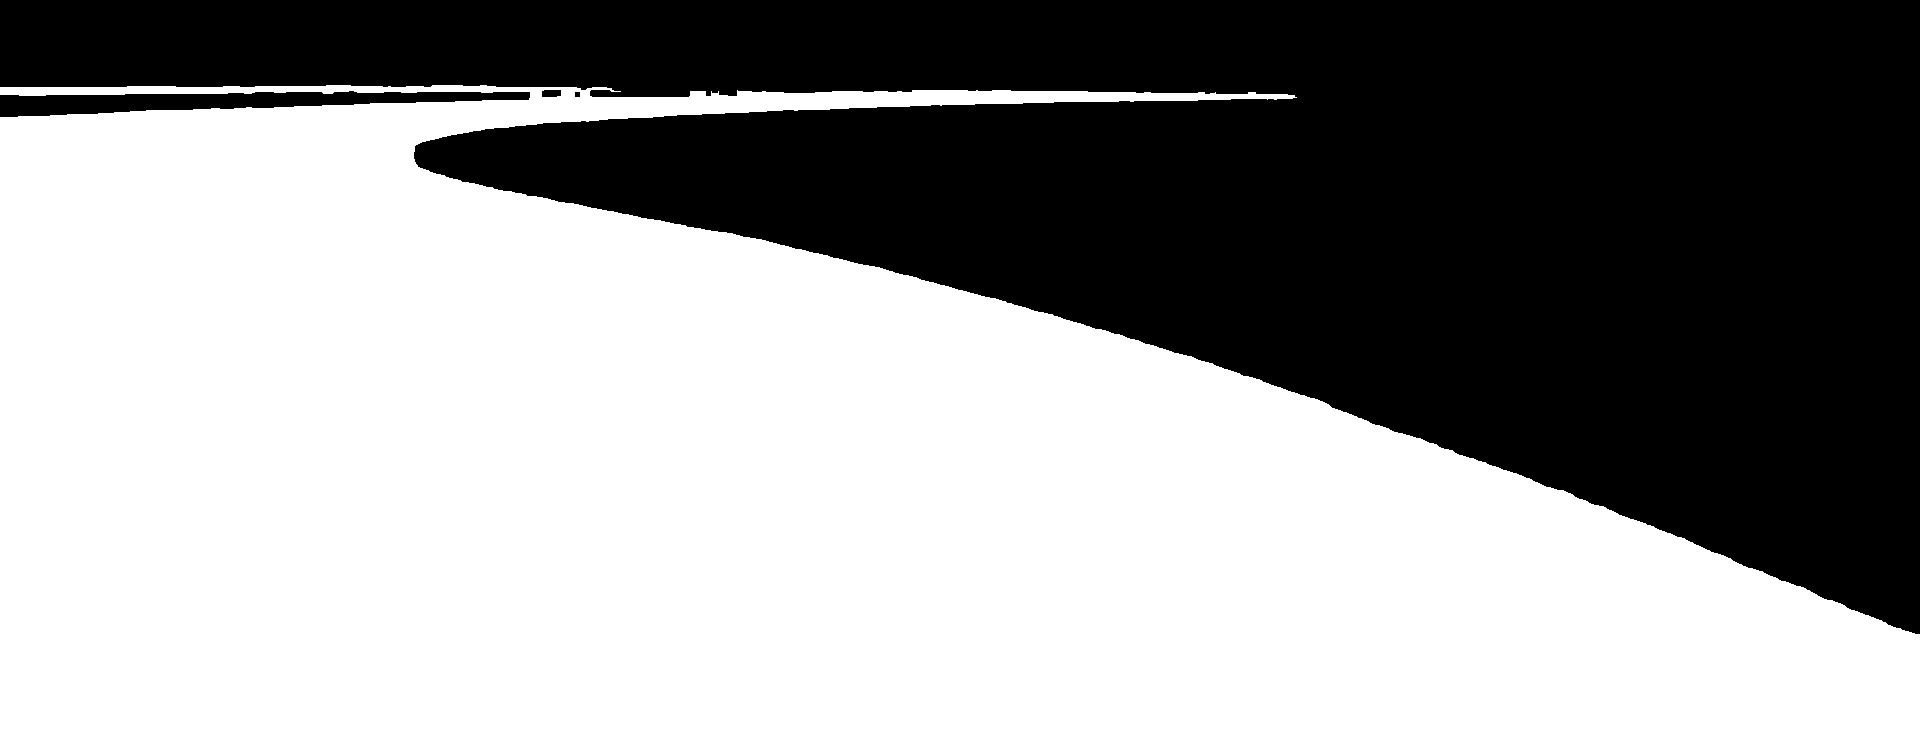
As a quick recap from last time, we started with this image: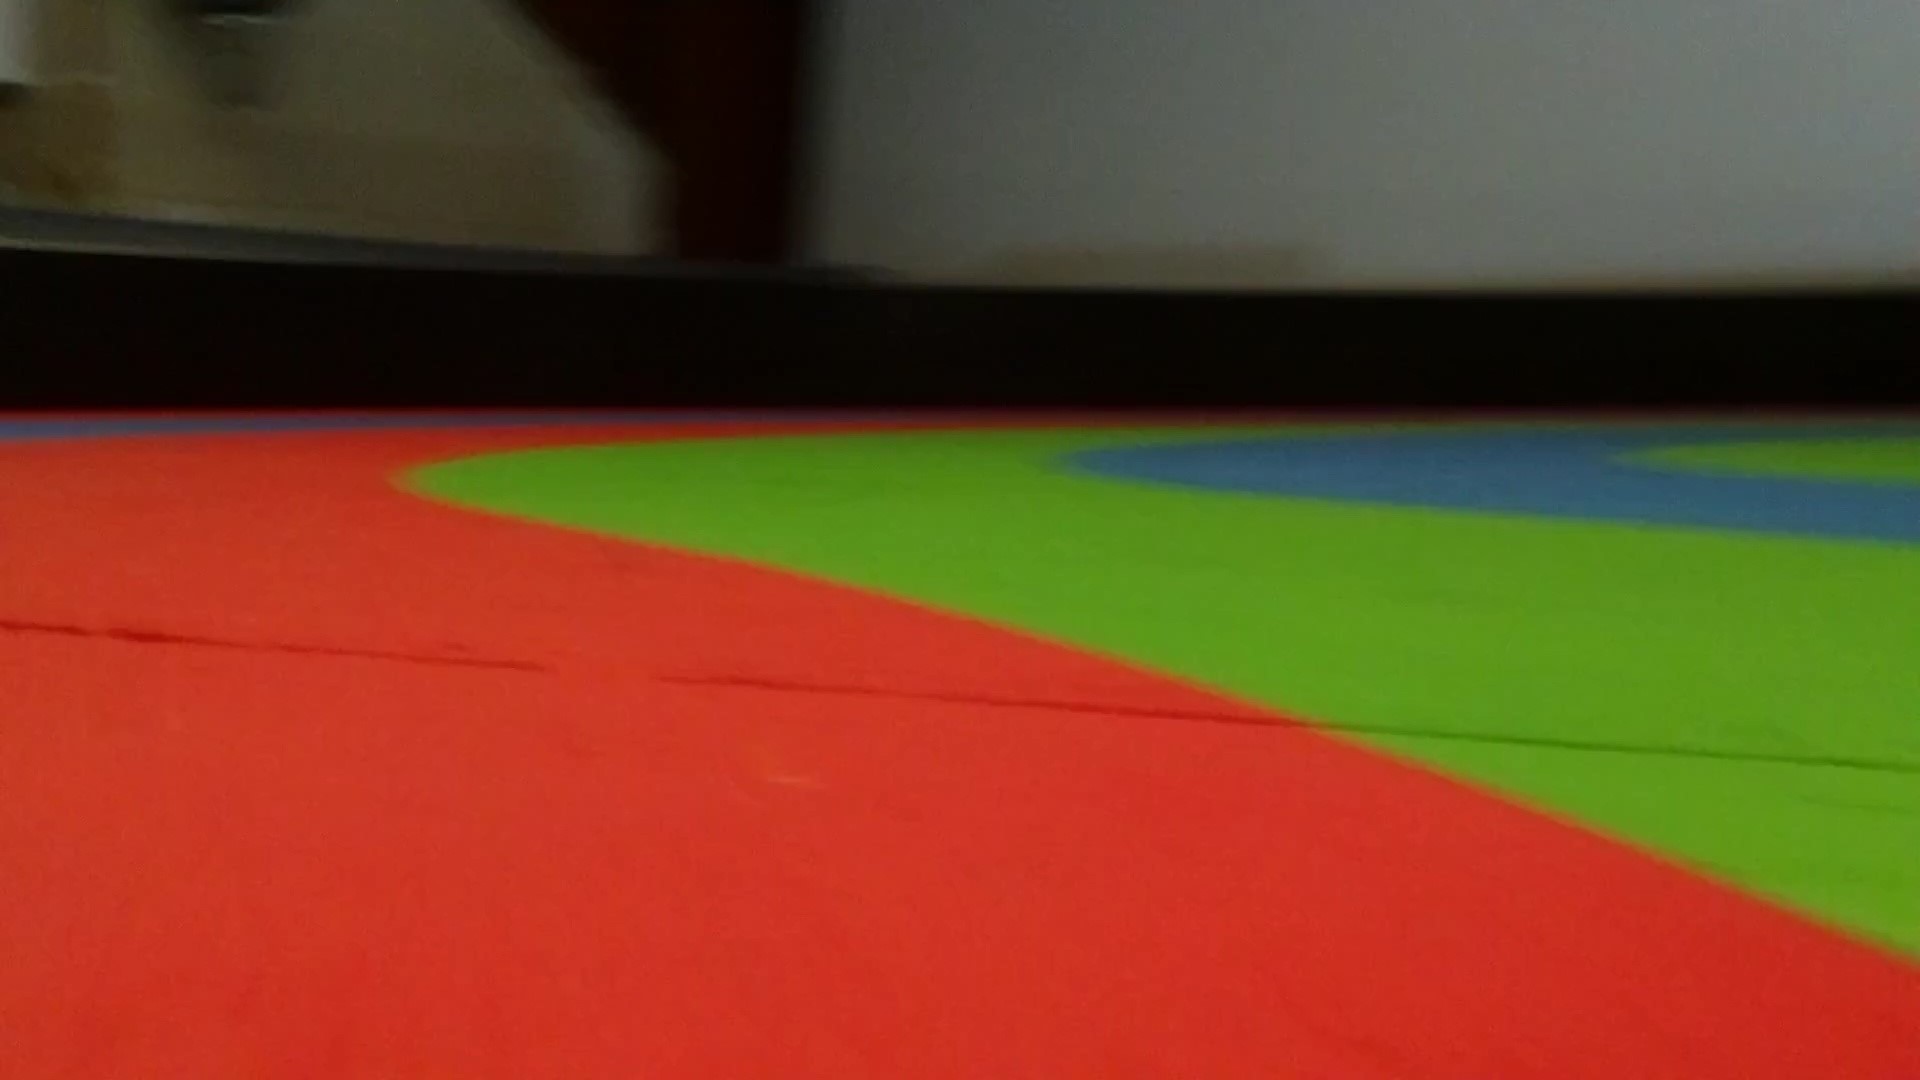
and using some processing we got to this: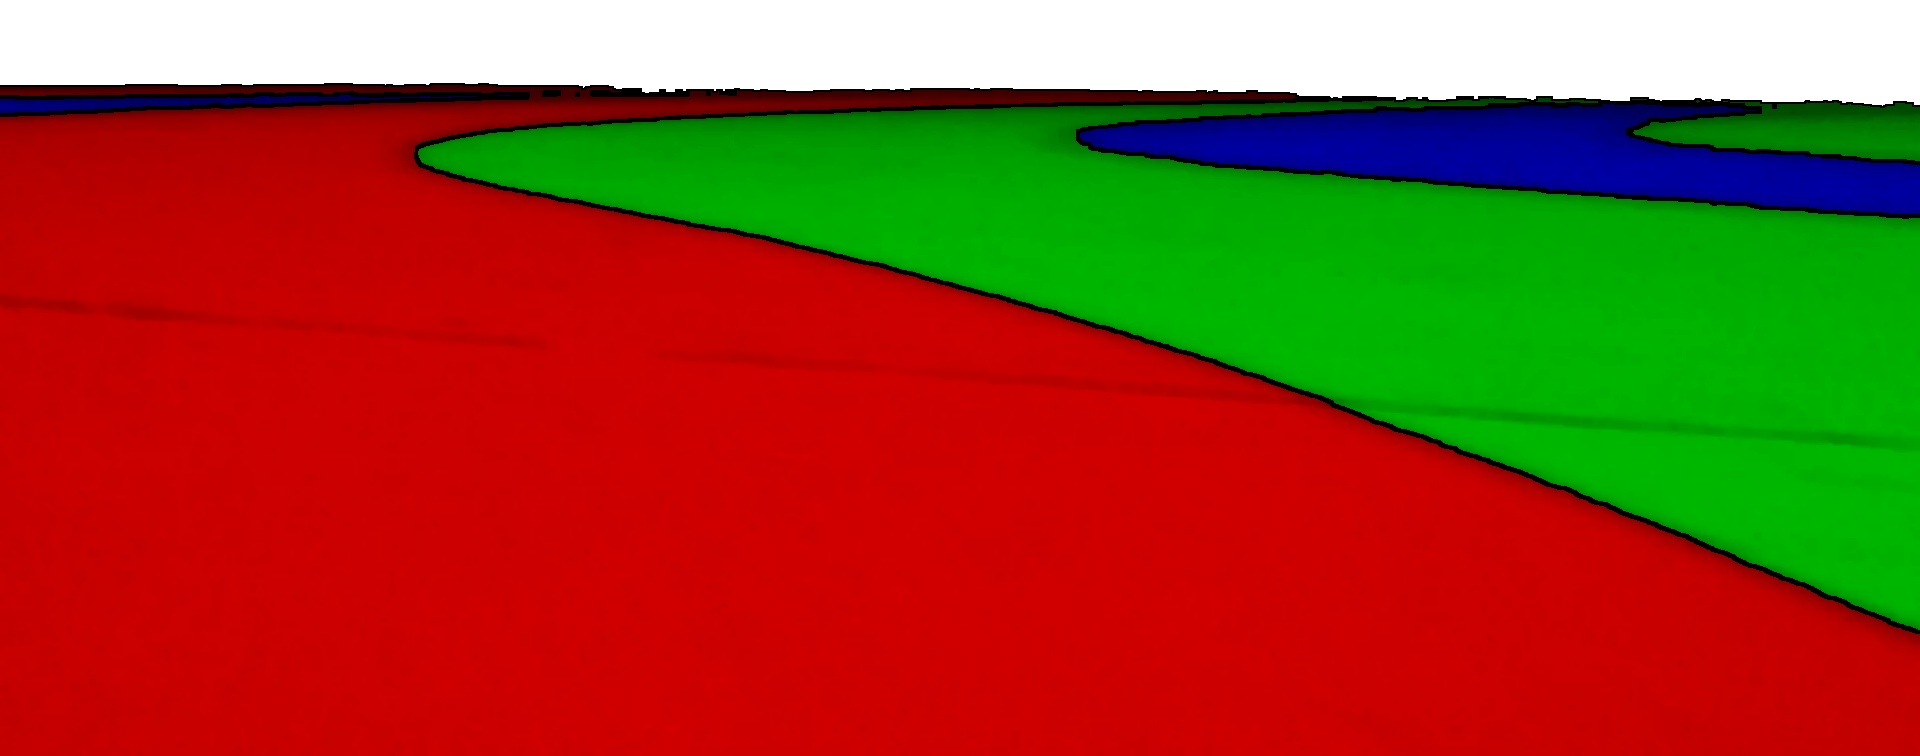
We will be continuing the code from the previous part, which you can find here:
Finding the track lanes, Part I
So how do we decide where to place our points?
What we want to do is 'scan' along the image in many places and find the outsides of the three colours.
Before we can do that they need to be simplified to True or False arrays.
We can do this very simply by using the inbuilt functionality of numpy:
red   = red   > 0
green = green > 0
blue  = blue  > 0
walls = walls > 0
The only trouble here is that cv2.imwrite will not handle this data type.
We can make a function to help us by making the values between 0 and 255 instead:
def WriteMask(name, mask):
    image = mask * 255
    cv2.imwrite(name, image)
We can then write our masks like so:
WriteMask('blue-mask.jpg',  blue)
WriteMask('green-mask.jpg', green)
WriteMask('red-mask.jpg',   red)
WriteMask('walls-mask.jpg', walls)
Which gives this for the colours: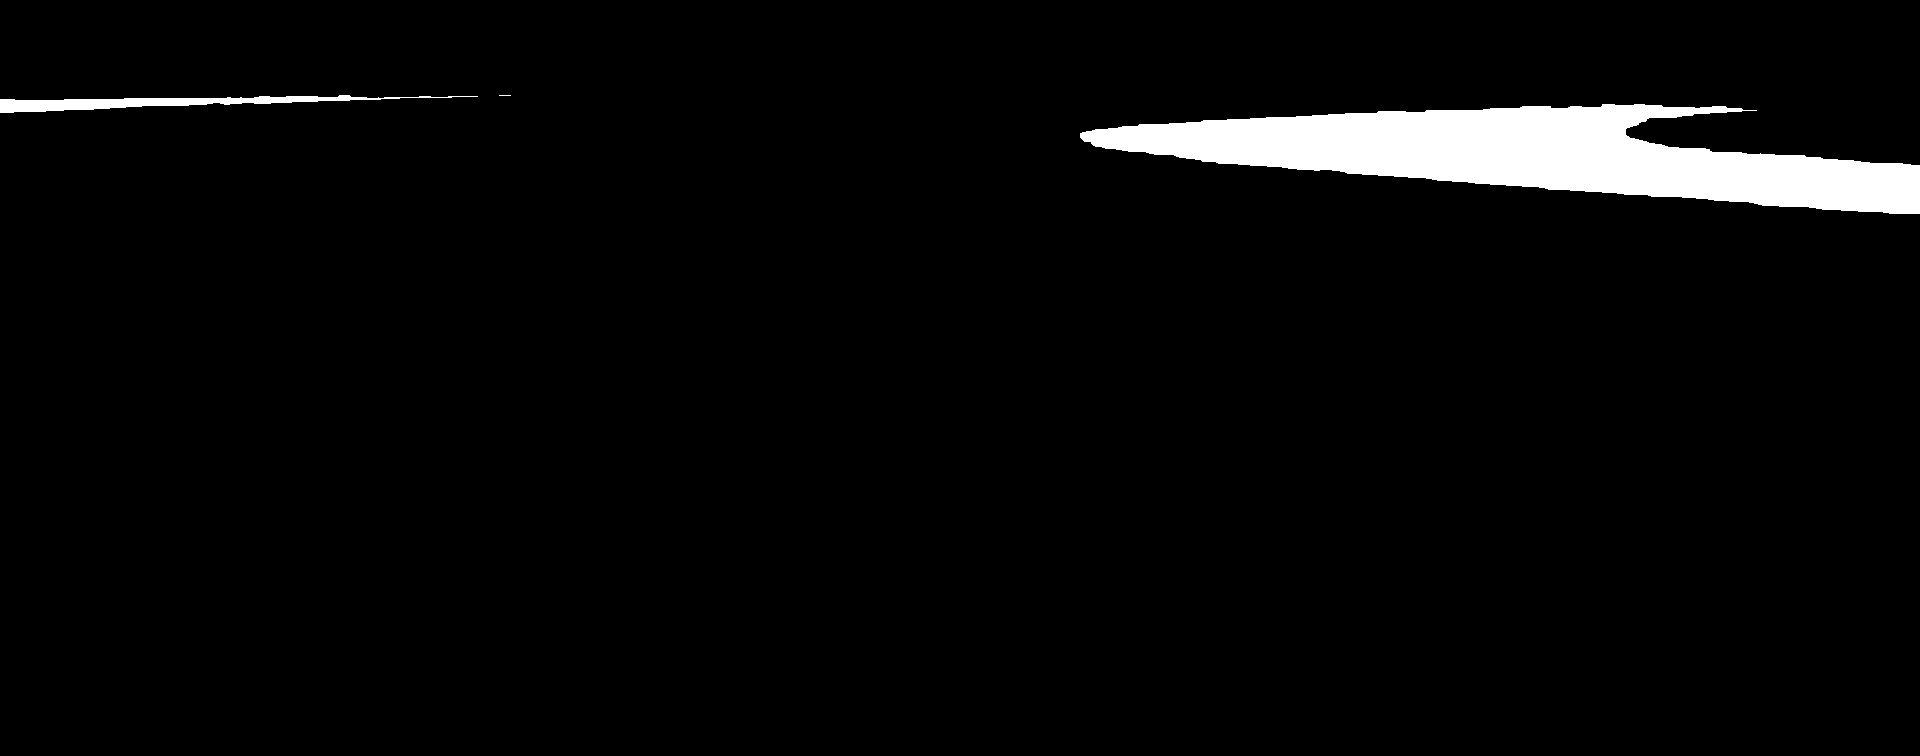
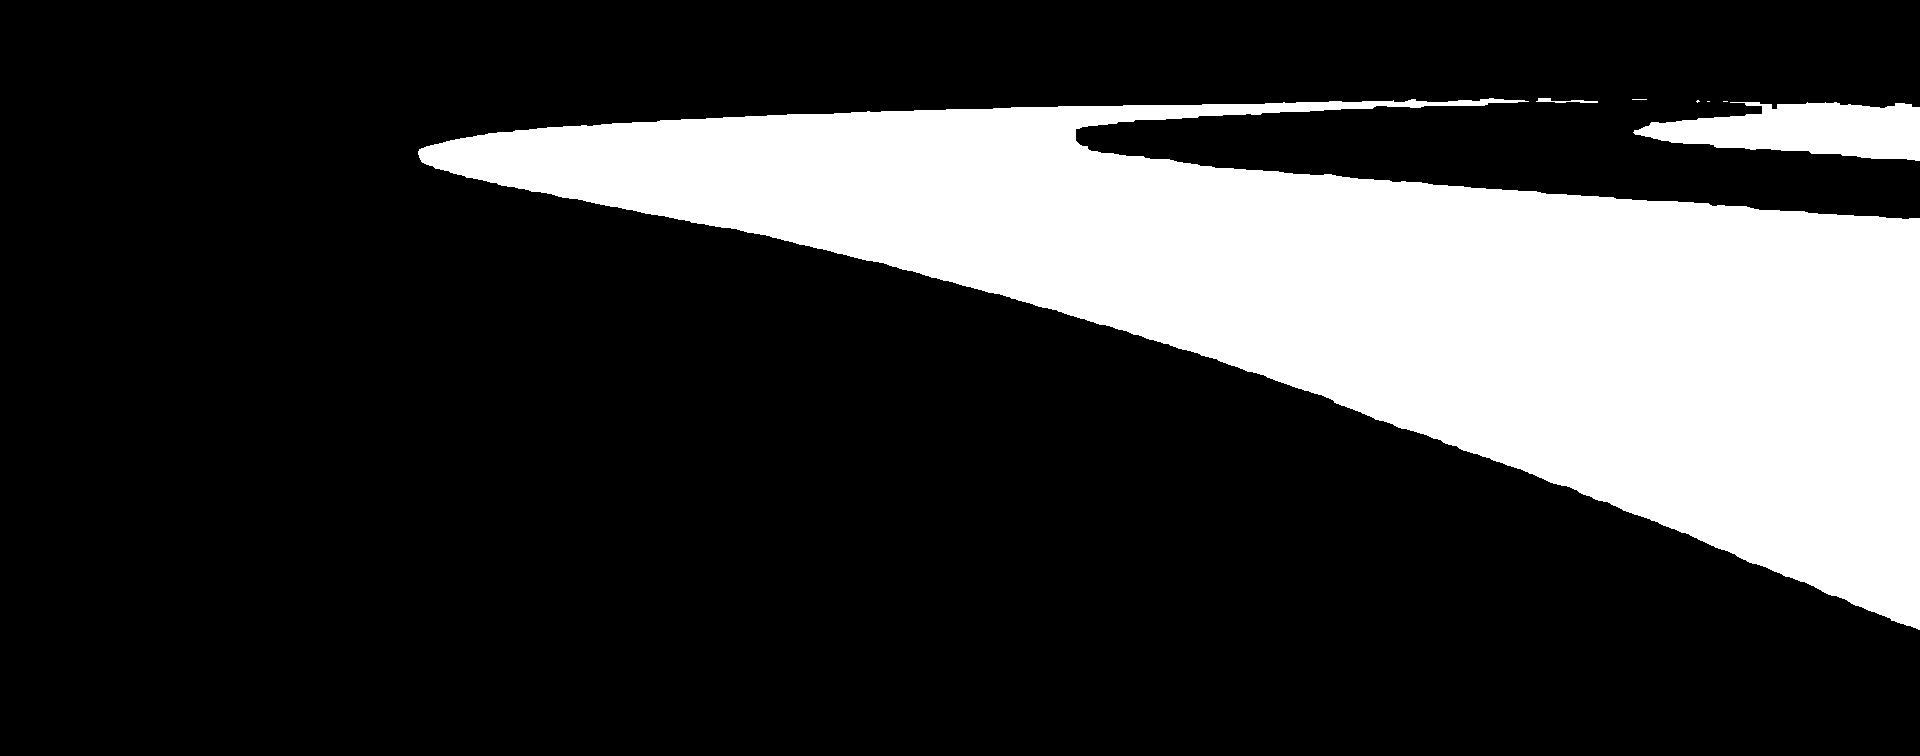
Note how the image is simply black or white now, no grey like last time.
The next thing to do is decide where in the image we will take slices.
This code will generate 100 slices along the original image:
grid = 100
scanLines = []
for i in range(grid):
    # Work out the position in the original image
    position = (i / float(grid)) * height
    position = int(position)
    # Work out the cropped position
    if position < cropTop:
        # Above our cropped region
        pass
    elif position >= cropBottom:
        # Below our cropped region
        pass
    else:
        # In the cropped region, correct and add to our list
        croppedY = int(position - cropTop)
        scanLines.append(croppedY)
# Show the list of positions
print scanLines
There were 70 values within the crop we did, this is because we cropped away 30% of the image :)
We can better illustrate where these lines are by drawing them.
We do this by making a brand new image the same size as the cropped one.
Then we draw our lines on top of it:
# Make a black image the same size as our cropped image
scanLineImage = numpy.zeros_like(cropped)
colourWhite = (255, 255, 255)
# Loop over each line
for y in scanLines:
    cv2.line(scanLineImage, (0,y), (width-1,y), colourWhite, 1)
cv2.imwrite('scanlines.jpg', scanLineImage)
which looks like: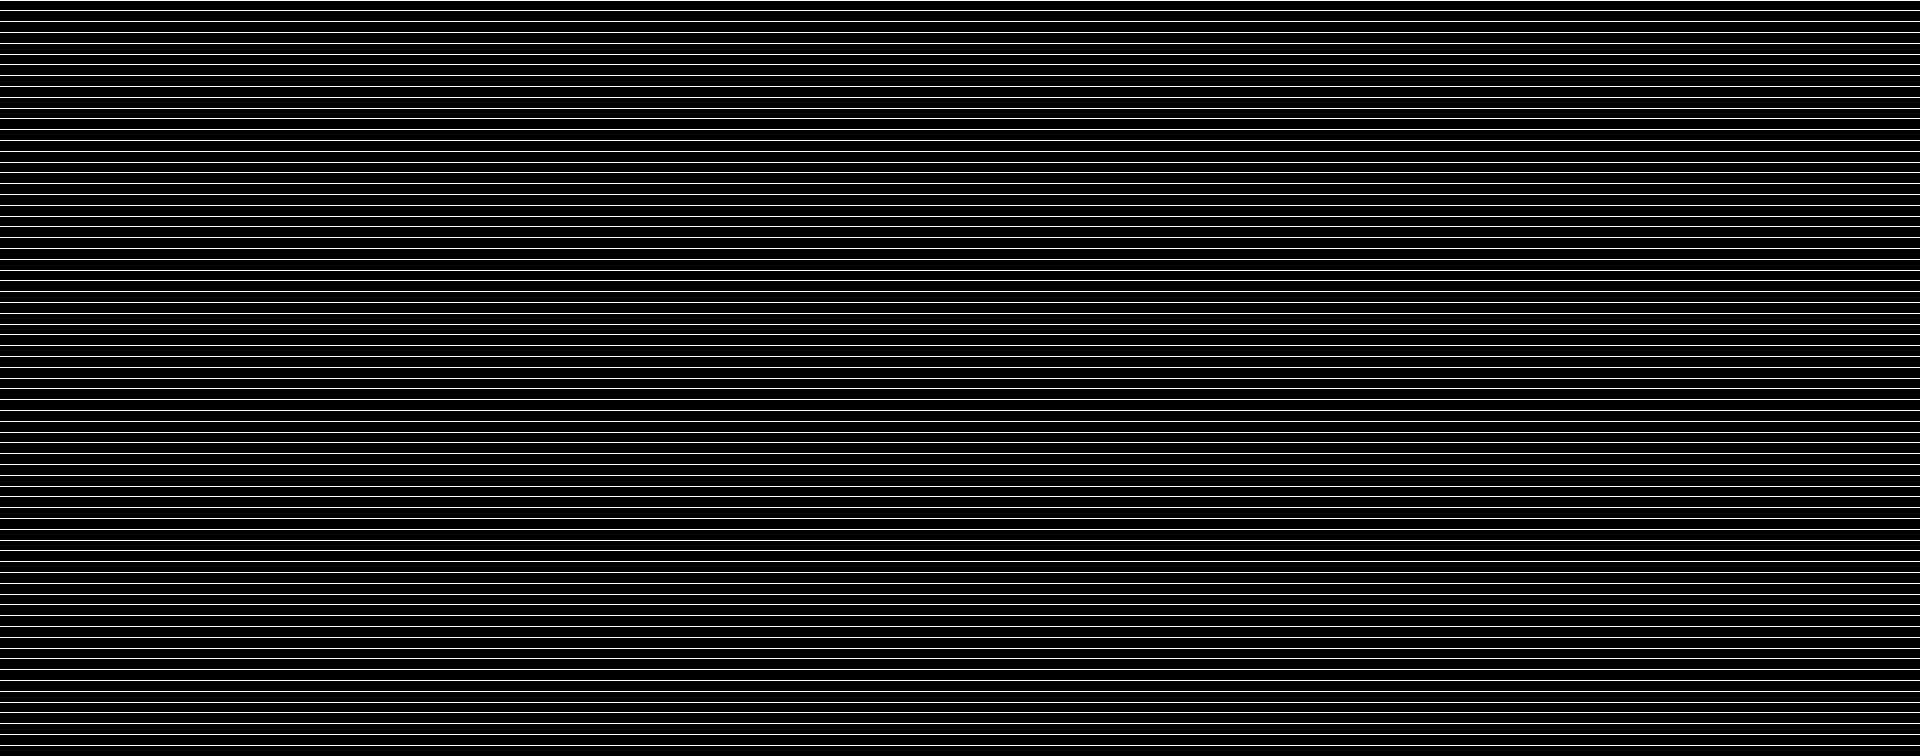
Now we have some lines to scan, how do we scan a line?
We get numpy to help with that as well.
We make ourselves a little function which will find the edges in a mask image:
def SweepLine(mask, y):
    found = []
    # Grab the line of interest
    line = mask[y, :]
    # Get numpy to give us a list of the positions where the line changes in value
    changed = numpy.where(line[:-1] != line[1:])[0]
    # Remove changes too close to the edge of the image
    for i in changed:
        if i < 2:
            pass
        elif i > (width - 3):
            pass
        else:
            found.append(i)
    # Return the found values
    return found
A quick test with a position of 135 in the green mask for example:
print SweepLine(green, 135)
shows [476, 1075, 1640] in our example.
That would mean the green value changes three times on that line.
We can now process each line, but we still need to match the lines together.
We do this by looking for similar positions:
# The values of try1, try2, try3 are used to attempt a match with target
# Any matches are added to existing lists matched1, matched2, matched3
# Any values which cannot be matched are added to the existing list unmatched
def FindMatches(y, target, try1, try2, try3, matched1, matched2, matched3, unmatched):
    maxSeperation = int(width * 0.05)
    # Loop over all the values in target:
    while len(target) > 0:
        # Remove the next value from the list of targets
        xt = target.pop()
        matched = False
        # See if try1 can match it
        if try1:
            for x1 in try1:
                if abs(x1 - xt) < maxSeperation:
                    # Matched, work out the point and add it
                    matched = True
                    try1.remove(x1)
                    x = (xt + x1) / 2
                    matched1.append((x, y))
                    break
            if matched:
                continue
        # See if try2 can match it
        if try2:
            for x2 in try2:
                if abs(x2 - xt) < maxSeperation:
                    # Matched, work out the point and add it
                    matched = True
                    try2.remove(x2)
                    x = (xt + x2) / 2
                    matched2.append((x, y))
                    break
            if matched:
                continue
        # See if try3 can match it
        if try3:
            for x3 in try3:
                if abs(x3 - xt) < maxSeperation:
                    # Matched, work out the point and add it
                    matched = True
                    try3.remove(x3)
                    x = (xt + x3) / 2
                    matched3.append((x, y))
                    break
            if matched:
                continue
        # No matches
        unmatched.append((xt, y))
The function is fairly long but quite simple.
It takes a list of points to try and match and one or more lists to try and match it with.
Each point is then added to one of the matched lists, or is added to the unmatched list.
So we now have:
- Four image masks we can match
- A set of lines to scan over
- A function to scan for changes
- A function to find matches between two or more lists
We are now ready to find all of our points :)
What we do is go through each line in turn and:
- Scan each mask for the changes (if any) on that line
- Attempt to match each line with any it might be next to
- Keep all the matches in the same list for all of the lines
We do that like this:
# Make our matched lists
matchRG = []
matchRB = []
matchRW = []
matchGB = []
matchGW = []
unmatched = []
# Loop over each line
for y in scanLines:
    # Scan the masks
    edgeR = SweepLine(red,   y)
    edgeG = SweepLine(green, y)
    edgeB = SweepLine(blue,  y)
    edgeW = SweepLine(walls, y)
    # Do the matching
    FindMatches(y, edgeR, edgeG, edgeB, edgeW, matchRG, matchRB, matchRW, unmatched)
    FindMatches(y, edgeG, edgeB, edgeW, None, matchGB, matchGW, None, unmatched)
    # Add any left over points to the unmatched list
    others = edgeB[:]
    others.extend(edgeW)
    for x in others:
        unmatched.append((x, y))
It would help a lot if we could see our points at this stage.
We can make a quick function to draw a cross on the image like this:
def DrawCross(image, (x, y), (r, g, b)):
    crossSize = 5
    width = image.shape[1]
    height = image.shape[0]
    # Build the list of points to change
    points = []
    for i in range(-crossSize, crossSize + 1):
        points.append((x + i, y))
        points.append((x, y + i))
    # Change the points on the image
    for point in points:
        x = point[0]
        y = point[1]
        if (x >= 0) and (y >= 0) and (x < width) and (y < height):
            image.itemset((y, x, 0), b)
            image.itemset((y, x, 1), g)
            image.itemset((y, x, 2), r)
Now we have everything we need to plot all of our points onto a blank image:
pointImage = numpy.zeros_like(cropped)
for point in matchRG:
    DrawCross(pointImage, point, (255, 255, 0))
for point in matchRB:
    DrawCross(pointImage, point, (255, 0, 255))
for point in matchRW:
    DrawCross(pointImage, point, (255, 0, 0))
for point in matchGB:
    DrawCross(pointImage, point, (0, 255, 255))
for point in matchGW:
    DrawCross(pointImage, point, (0, 255, 0))
for point in unmatched:
    DrawCross(pointImage, point, (127, 127, 127))
cv2.imwrite('points.jpg', pointImage)
which gives us: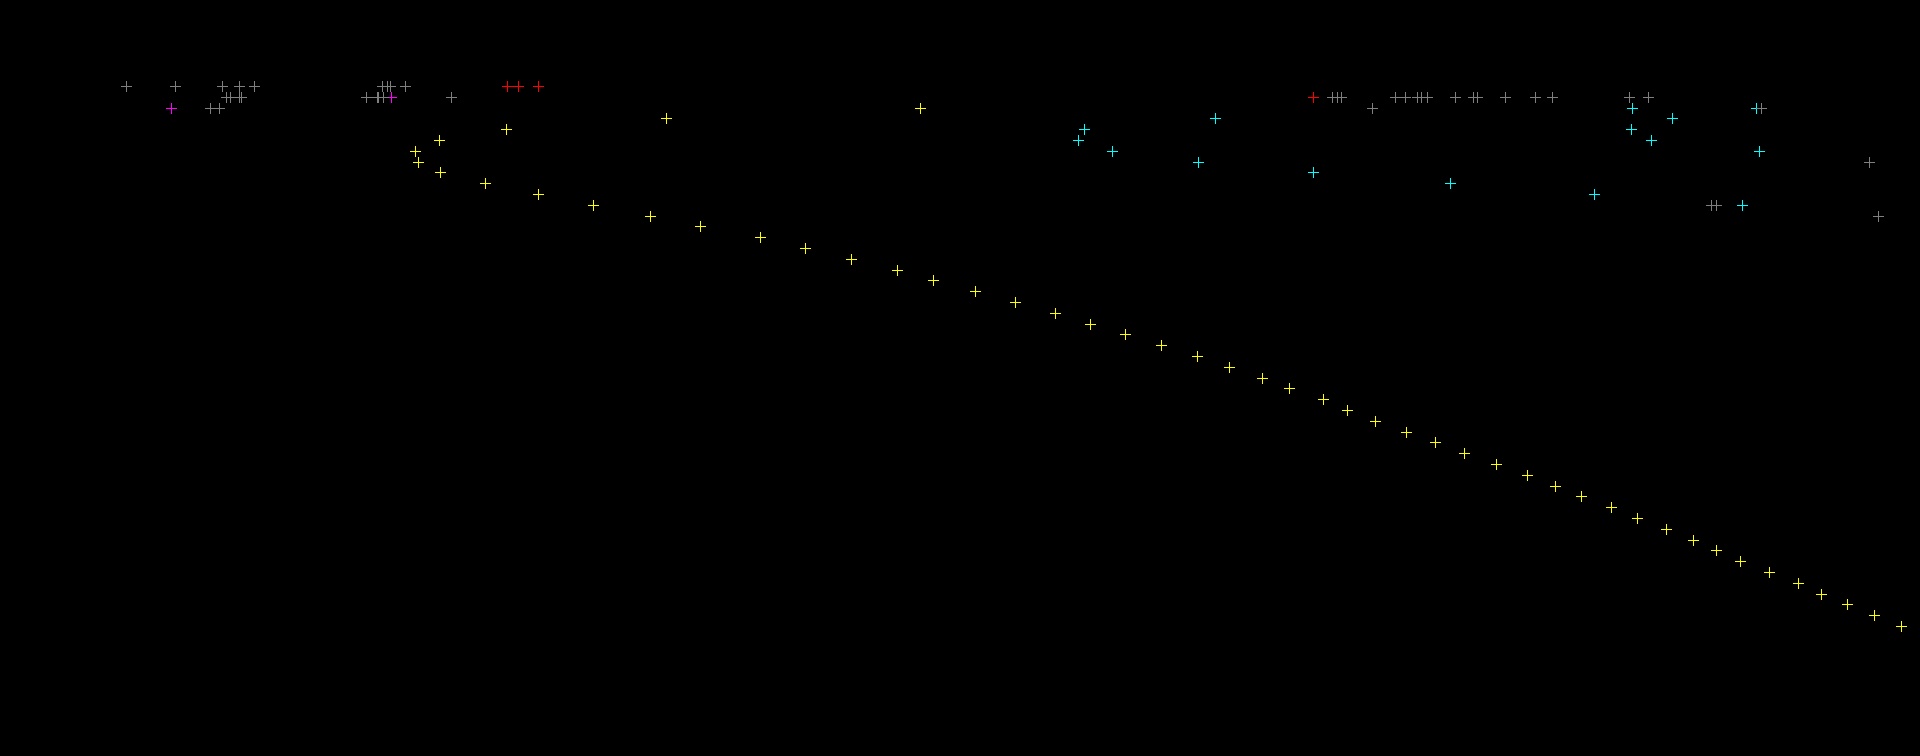
We can do the same thing using the cropped image as a base instead:
pointImage = cropped[:,:,:]
for point in matchRG:
    DrawCross(pointImage, point, (255, 255, 0))
for point in matchRB:
    DrawCross(pointImage, point, (255, 0, 255))
for point in matchRW:
    DrawCross(pointImage, point, (255, 0, 0))
for point in matchGB:
    DrawCross(pointImage, point, (0, 255, 255))
for point in matchGW:
    DrawCross(pointImage, point, (0, 255, 0))
for point in unmatched:
    DrawCross(pointImage, point, (127, 127, 127))
cv2.imwrite('points2.jpg', pointImage)
which gives us: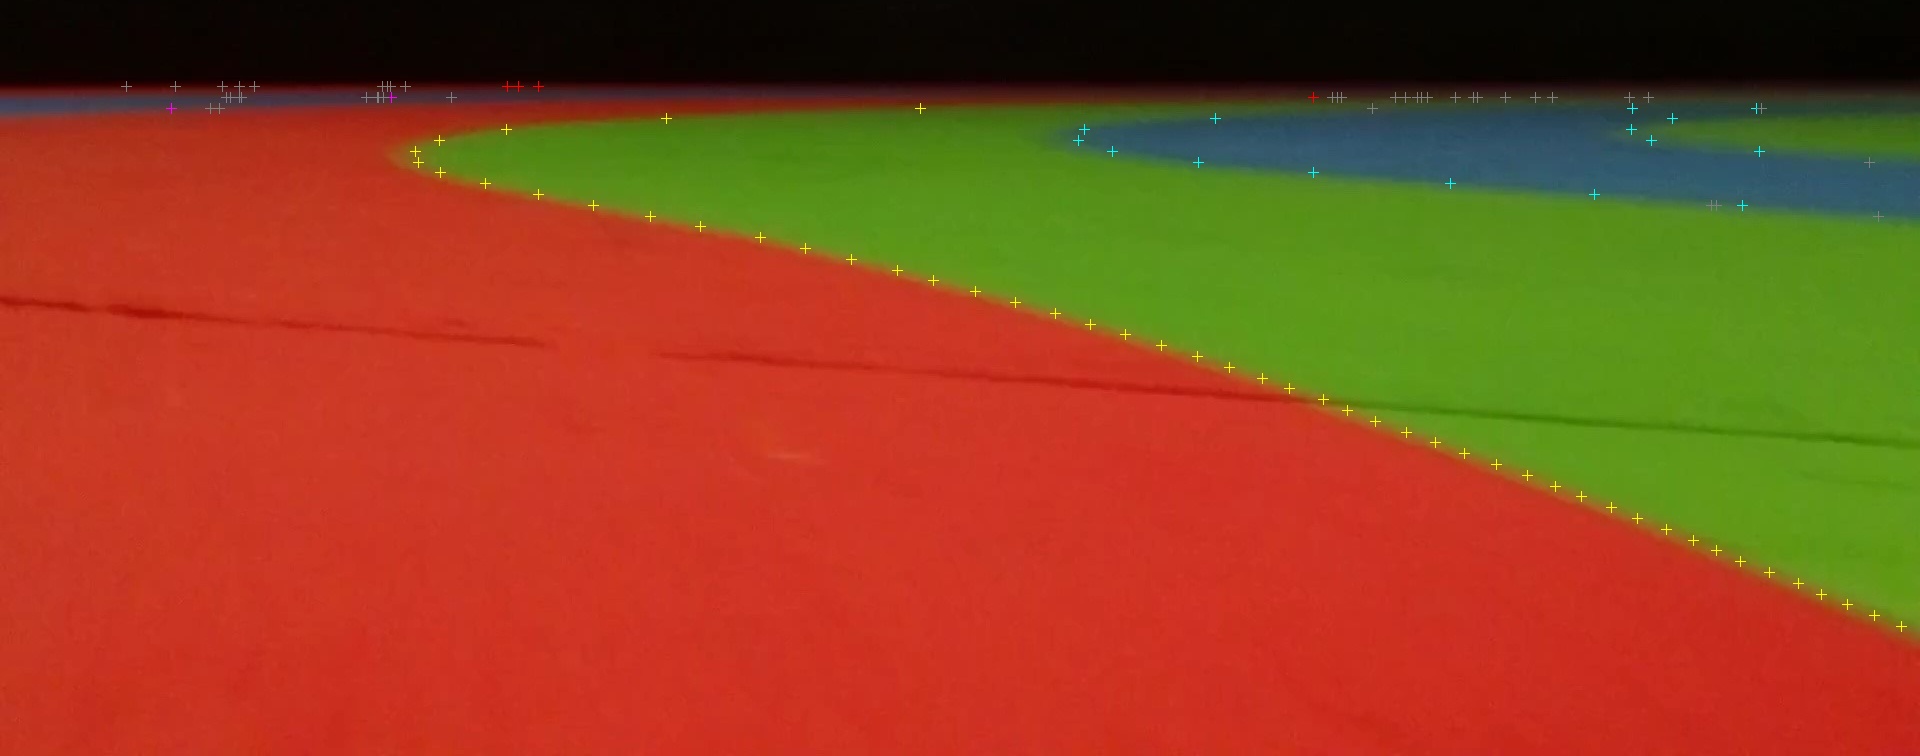
In the standard Race Code processing we also check if the changes are True to False or False to True.
This allows the code to tell the ordering of the changes when it makes a difference.
For example in the images above the green | blue line is labelled the same as the blue | green line.
While the changes to see if the edges are changing to on or off are simple, they do make the code a fair bit longer.
In fact our standard processing has a total of:
- Seven valid matching pairs
- Two invalid matches: wrong-way and unknown
- Two returned lists from
SweepLine: rising and falling - Four calls to
FindMatchesto determine all of the matches
All of these points can be seen from Race.py by calling TrackLines().
These are the points which we will use to determine where the track is and where it will be heading.
Stay tuned for Part III where we work this all out from the points!
Add new comment